How to 3D Print Demon Miniatures — Complete Resin Printing Guide
3D printable demon miniatures represent some of the most complex and rewarding models you can produce on a consumer resin printer. Multi-headed kings, sprawling dragon mounts, intricate sigils, and flowing robes -- these are not beginner-friendly geometries, but they are absolutely achievable with the right equipment, settings, and workflow. This guide covers everything you need to know to go from downloaded STL file to painted demon king on your shelf.
Choosing the Right Resin Printer
Demon miniatures demand fine detail resolution and enough build volume to handle large boss-scale models. Here are the three tiers of printers we recommend in 2026:
Entry Level: Elegoo Mars 4 Ultra / Anycubic Photon Mono M5s
Both printers offer 4K+ resolution at the 6-7 inch build plate size, which is sufficient for 32mm character models and smaller demon figures. Expect to print larger 75mm boss models in parts. Street price: $200-300. These are excellent first printers for hobbyists entering the resin miniature space.
Mid Range: Elegoo Saturn 4 Ultra / Phrozen Sonic Mega 8K
The sweet spot for serious miniature printing. 8K+ resolution with build plates large enough to print most 75mm boss models in a single piece -- including wing spans and extended tails. Street price: $400-600. If you plan to print Ars Goetia demon kings regularly, this is the tier to target.
Enthusiast: Phrozen Sonic Mega 8K S / Elegoo Jupiter SE
For printers who want to produce the largest boss models without splitting -- or who want to batch-print multiple 32mm miniatures per plate. 10+ inch build plates with 8K+ resolution. Street price: $700-1,000. These are production-grade machines for dedicated hobbyists.
Resin Selection
Not all resins are created equal, and demon miniatures with their fine surface detail and complex geometry benefit from choosing the right formulation:
- Standard grey/black resin -- The workhorse for miniature printing. Grey resin provides the best visual feedback for checking detail quality before painting. Elegoo Standard, Anycubic Basic, and Siraya Tech Fast are all reliable choices. Use this for 90% of your prints.
- ABS-like resin -- Adds flexibility and impact resistance to cured prints. Recommended for models with thin, protruding elements (swords, staffs, wing tips, viper tails) that might snap during support removal. Siraya Tech Tenacious mixed at 15-20% with standard resin is a popular blend for durability without sacrificing detail.
- High-detail resin -- Formulations like Phrozen Aqua Grey 8K or Siraya Tech Sculpt are optimized for fine surface detail. Use these for display-grade prints where you want maximum sharpness on sigils, scales, and facial features. They tend to be more brittle, so handle with care during support removal.
- Water-washable resin -- Convenient for cleanup (water instead of isopropyl alcohol) but generally inferior in detail reproduction and mechanical properties. Acceptable for tabletop-quality prints; avoid for display-grade work.
Why Presupported STL Files Matter
This is the single most important factor in successfully printing complex demon miniatures. Supporting a model means adding temporary scaffolding structures that prevent overhanging geometry from collapsing during the layer-by-layer curing process. For a simple humanoid figure, manual supporting is straightforward. For a three-headed demon king riding a dragon with outstretched wings and a coiling serpent tail, manual supporting is a multi-hour nightmare with a high failure rate.
Clay Cyanide ships every STL file fully presupported. This means the supports have been placed by the sculpting team, tested across multiple consumer printers (Elegoo, Anycubic, Phrozen), and validated for clean printing at standard resin settings. You load the presupported file into your slicer, orient it to the build plate (the orientation is already set), slice, and print. No support placement. No guessing. No failed 12-hour prints.
Unsupported versions are also included for experienced users who prefer to support models themselves or who want to scale the model to non-standard sizes.
Slicer Settings for Demon Miniatures
These are baseline settings that work well across most consumer MSLA printers. Adjust based on your specific printer and resin combination:
- Layer height: 0.03-0.05mm. Use 0.03mm for display-grade detail (sigils, facial features, scale textures). Use 0.05mm for tabletop-quality prints where speed matters more than maximum sharpness.
- Normal exposure: 1.5-2.5 seconds (varies by resin and printer). Underexposure causes layer delamination; overexposure causes detail loss. Run a calibration test (the Ameralabs Town or RERF test) before committing to a long boss print.
- Bottom exposure: 25-40 seconds for the first 5-8 layers. This ensures adhesion to the build plate. Too little and the print detaches; too much and bottom layers bloat.
- Lift speed: 1-2mm/s for the initial lift, 3-4mm/s for the retract. Slow lift speeds reduce suction force on large cross-section layers (like dragon wings), preventing layer separation and FEP damage.
- Anti-aliasing: Enable 4x or 8x anti-aliasing if your slicer supports it. This smooths layer lines on curved surfaces, which is critical for organic demon anatomy.
Post-Processing Workflow
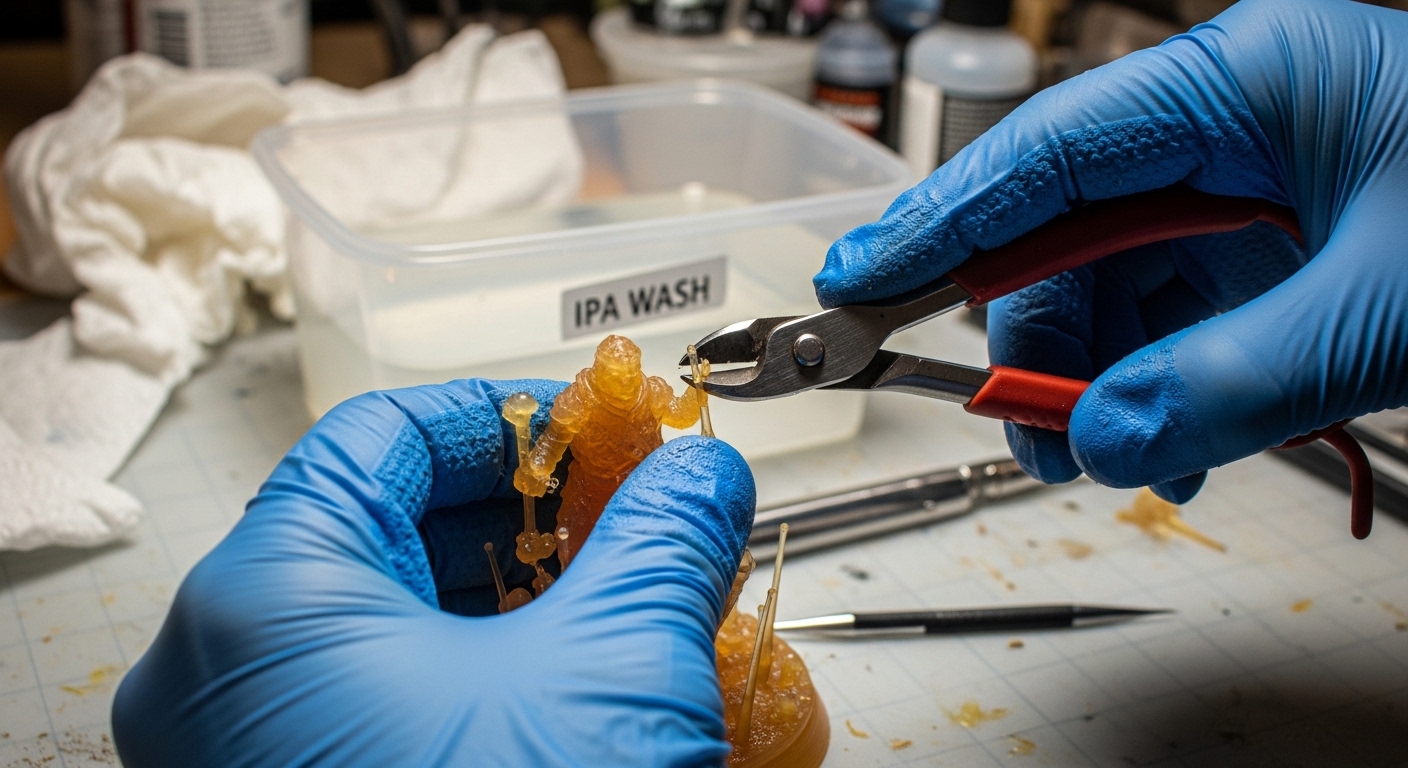
Step 1: Washing
Remove the print from the build plate and wash in 95%+ isopropyl alcohol (IPA) for 2-3 minutes in an ultrasonic cleaner or wash station. Do not over-wash -- prolonged IPA exposure can soften fine details. For water-washable resins, use running lukewarm water for 2-3 minutes.
Step 2: Support Removal
Remove supports before final UV curing while the resin is still slightly flexible. Use flush cutters to snip supports at the contact point, then clean nubs with a hobby knife or fine-grit sanding stick (400-600 grit). Work slowly around delicate elements -- horns, wing membranes, weapon blades. Clay Cyanide's presupports use light-touch contact points designed for clean removal with minimal scarring.
Step 3: UV Curing
Cure the model under 405nm UV light for 3-8 minutes per side, depending on resin type and model thickness. A rotating UV curing station (Elegoo Mercury or Anycubic Wash & Cure) provides even exposure. Under-curing leaves the model tacky and fragile; over-curing makes it brittle and can yellow lighter resins.
Step 4: Assembly
Larger demon miniatures may ship as multi-part files for optimal print orientation. Dry-fit all parts before gluing. Use medium-viscosity cyanoacrylate (super glue) for most joints. For heavy components (wings, mounted riders), pin the joint with a 1mm brass rod drilled into both surfaces before gluing for structural reinforcement.
Step 5: Priming and Painting
Prime with a dedicated miniature primer -- Vallejo Surface Primer or Citadel Chaos Black spray are industry standards. Apply in thin, even coats to avoid filling in fine detail. For demon miniatures, a zenithal prime (black base coat + white highlight from above) is particularly effective, as it pre-establishes the dramatic shadows that suit dark fantasy aesthetics.
Paint with acrylic miniature paints (Vallejo, Citadel, Army Painter, ProAcryl). Demon miniatures reward techniques like drybrushing (for scale textures and fur), glazing (for skin transitions and flame effects), and contrast/wash techniques (for recessed sigils and deep folds). The level of sculpted detail on Clay Cyanide models means that even basic painting techniques produce dramatic results -- the detail does the heavy lifting.
Troubleshooting Common Issues
- Failed supports / detached islands: Usually caused by insufficient support density on large overhangs. Always use presupported files for complex models. If supporting manually, increase support density under wings and horizontal surfaces.
- Layer lines visible on curved surfaces: Reduce layer height to 0.03mm and enable anti-aliasing. Orient the model so curved surfaces (faces, torsos) are not parallel to the build plate.
- Brittle thin elements (horns, weapons): Mix 15-20% flexible resin (Siraya Tenacious) with your standard resin. This adds flex without sacrificing detail.
- Sticky/tacky surface after curing: Indicates insufficient washing or UV exposure. Re-wash in fresh IPA and extend curing time. Ensure your UV wavelength matches your resin (405nm is standard).
Start Printing
With the right equipment and workflow, resin 3D printing produces demon miniatures with a quality that rivals -- and often exceeds -- traditionally manufactured figures. The combination of consumer-grade 8K printers and professionally presupported STL files has made the hobby more accessible than ever.
Browse the best dark fantasy STL files to find your first (or next) print project, explore the full Clay Cyanide catalogue of over 1,100 presupported models, or join the Covenant on Patreon to receive new demon miniatures every month. For the lore behind the demons you are printing, read our guide to the Ars Goetia and its 72 spirits.